Configurar VPN en CentOs Linux
Conectarte a tu red local de forma segura es algo que hay en día debe ser prioritario ya que los hackers están intentan detectar accesos por diversos programas VNC y servicios de escritorio remoto o Remote Desktop.
Tener una VNP privada es una de las formas más seguras que están al alcance de tu mano, teniendo unos conocimiento mínimos en adminsitración de sistemas bajo linux y windows.
En este artículo vamos a utilizar el OpenVPN Server y el OpenVPN Client descargable en su web https://openvpn.net/community-downloads/
Configurar OpenVPN Server en CentOS usando EasyRSA 3
Primero necesitas un servidor Linux y en este caso lo haremos para CentOS 8. Actualizar el software e instalar el repositorio de EPEL.
# sudo yum update -y
# sudo yum install epel-release -y
Después instalar openvpn, easyrsa, iptables y algunas herramientas de resolución de problemas de red.
# sudo yum install -y openvpn easy-rsa iptables iptables-services wget net-tools bind-utils nc mtrConfigurar OpenVpn
Copiar el siguiente codigo a un fichero /etc/openvpn/server.conf
Puedes utilizar el editor vi o nano
#nano /etc/openvpn/server.conf# Secure OpenVPN Server Config
# Basic Connection Config
dev tun
proto udp
port 1194
keepalive 10 120
max-clients 5
# Certs
ca ca.crt
cert server.crt
key server.key
dh dh.pem
tls-auth ta.key 0
# Ciphers and Hardening
reneg-sec 0
remote-cert-tls client
crl-verify crl.pem
tls-version-min 1.2
cipher AES-256-CBC
auth SHA512
tls-cipher TLS-DHE-RSA-WITH-AES-256-GCM-SHA384:TLS-DHE-RSA-WITH-AES-256-CBC-SHA256:TLS-DHE-RSA-WITH-AES-128-GCM-SHA256:TLS-DHE-RSA-WITH-AES-128-CBC-SHA256
# Drop Privs
user nobody
group nobody
# IP pool
server 172.31.100.0 255.255.255.0
topology subnet
ifconfig-pool-persist ipp.txt
client-config-dir ccd
# Misc
persist-key
persist-tun
comp-lzo
# DHCP Push options force all traffic through VPN and sets DNS servers
push "redirect-gateway def1 bypass-dhcp"
push "dhcp-option DNS 8.8.8.8"
push "dhcp-option DNS 8.8.4.4"
# Logging
log-append /var/log/openvpn.log
verb 3Crear el directorio de cliente
Este directorio se guardará la configuración y ficheros generados
# mkdir /etc/openvpn/ccdGenerar key y certificados
OpenVPN proporciona una herramienta llamada EasyRSA, que le permite generar las claves que necesitamos.
Iniciar el PKI
# cd ~
# /usr/share/easy-rsa/3/easyrsa init-pki
Crear el certificado de autoridad CA. se puede crear sin password indicando el parámetro nopass
# /usr/share/easy-rsa/3/easyrsa build-ca nopassO bien utilizar una contraseña omitiendo el parámetro nopass
# /usr/share/easy-rsa/3/easyrsa build-caindicar el nombre del servidor al cual se hará referencia al llamar al certificado.
#serverGenerar parámetros de Diffie-Helllman:
# /usr/share/easy-rsa/3/easyrsa gen-dhEsperar a que se genere el fichero dh.pem
DH parameters of size 2048 created at /root/pki/dh.pem
Generar las llaves o keys del servidor indicando el nombre del host (por ejemplo server):
# /usr/share/easy-rsa/3/easyrsa build-server-full server nopass
o con password
# /usr/share/easy-rsa/3/easyrsa build-server-full server
Generar las llaves o keys del cliente indicando el nombre del cliente (por ejemplo vpn-client-01):
# /usr/share/easy-rsa/3/easyrsa build-client-full vpn-client-01 nopass
o con password
# /usr/share/easy-rsa/3/easyrsa build-client-full vpn-client-01
Generar el certificado de revocación:
# /usr/share/easy-rsa/3/easyrsa gen-crlGenerar el pre-shared key:
# openvpn --genkey --secret pki/ta.keyCopiar ficheros generados
Los ficheros generado los copiamos a otra carpeta unica, la cual se comprimirá posteriormente
# sudo cp pki/ca.crt /etc/openvpn/ca.crt
# sudo cp pki/dh.pem /etc/openvpn/dh.pem
# sudo cp pki/issued/server.crt /etc/openvpn/server.crt
# sudo cp pki/private/server.key /etc/openvpn/server.key
# sudo cp pki/ta.key /etc/openvpn/ta.key
# sudo cp pki/crl.pem /etc/openvpn/crl.pem
Configurar el inicio automático del servicio OpenVPN
Para configurar el arranque automático al iniciar el sistema hay que ejecutar los siguientes comandos
# sudo systemctl -f enable [email protected]
# sudo systemctl start [email protected]
Para reiniciar usar el comando restart, o en su defecto primero stop y después start.
# sudo systemctl restart [email protected]Sin no funciona puedes revisar el log con el comando
# sudo tail -f /var/log/openvpn.logConfigurar Enrutamiento con IPTables
Es muy conveniente por motivos de seguridad bloquear la mayoría de las conexiones entrantes, excepto a través de SSH y el puerto OpenVPN. También querrá permitir el reenvío de paquetes desde clientes VPN a Internet en general, o de lo contrario el cliente solo podría conectar con el servidor VPN.
Esta configuración se puede hacer con iptables
#!/bin/bash

# REMEMBER: Run this as a single bash script or you'll lock yourself out of your machine.

# Flushing all rules
iptables -F FORWARD
iptables -F INPUT
iptables -F OUTPUT
iptables -X
# Setting default filter policy
iptables -P INPUT DROP
iptables -P OUTPUT DROP
iptables -P FORWARD DROP
# Allow unlimited traffic on loopback
iptables -A INPUT -i lo -j ACCEPT
iptables -A OUTPUT -o lo -j ACCEPT
# Accept outbound on the primary interface
iptables -I OUTPUT -o eth0 -d 0.0.0.0/0 -j ACCEPT
# Accept inbound TCP packets
iptables -I INPUT -i eth0 -m state --state ESTABLISHED,RELATED -j ACCEPT
# Allow incoming SSH
iptables -A INPUT -p tcp --dport 22 -m state --state NEW -s 0.0.0.0/0 -j ACCEPT
# Allow incoming OpenVPN
iptables -A INPUT -p udp --dport 1194 -m state --state NEW -s 0.0.0.0/0 -j ACCEPT
# Enable NAT for the VPN
iptables -t nat -A POSTROUTING -s 172.31.100.0/24 -o eth0 -j MASQUERADE
# Allow TUN interface connections to OpenVPN server
iptables -A INPUT -i tun0 -j ACCEPT
# Allow TUN interface connections to be forwarded through other interfaces
iptables -A FORWARD -i tun0 -j ACCEPT
iptables -A OUTPUT -o tun0 -j ACCEPT
iptables -A FORWARD -i tun0 -o eth0 -m state --state RELATED,ESTABLISHED -j ACCEPT
iptables -A FORWARD -i eth0 -o tun+ -m state --state RELATED,ESTABLISHED -j ACCEPT
# Allow outbound access to all networks on the Internet from the VPN
iptables -A FORWARD -i tun0 -s 172.31.100.0/24 -d 0.0.0.0/0 -j ACCEPT
# Block client-to-client routing on the VPN
iptables -A FORWARD -i tun0 -s 172.31.100.0/24 -d 172.31.100.0/24 -j DROP
Después iniciar o reiniciar el servicio para que tome esta configuración
sudo systemctl enable iptables
sudo systemctl start iptables
sudo service iptables save
Configurar el cliente OpenVpn
Después de la configuración del servidor VPN, ahora toca configurar el lado del cliente.
Para generar el cliente de OpenVpn hay dos formas:
- Editar un fichero cliente.ovpn y poner dentro la clave de los certificados
- Crear un fichero comprimido con todos los ficheros necesarios para importarlo con el cliente de OpenVpn
Editar fichero cliente OpenVpn
En un fichero con extensión .ovpn introducir el siguiente contenido y modificando los contenidos de los certificados:
- Fichero ca.crt: Sustituir el contenido de las etiquetas <ca> </ca> con el contenido del fichero ca.crt
- Fichero client.crt: Sustituir el contenido de las etiquetas <cert> </cert> con el contenido del fichero client.crt
- Fichero client.key: Sustituir el contenido de las etiquetas <key> </key> con el contenido del fichero client.key
##############################################
# Sample client-side OpenVPN 2.0 config file #
# for connecting to multi-client server.     #
#                                            #
# This configuration can be used by multiple #
# clients, however each client should have   #
# its own cert and key files.                #
#                                            #
# On Windows, you might want to rename this  #
# file so it has a .ovpn extension           #
##############################################

# Specify that we are a client and that we
# will be pulling certain config file directives
# from the server.
client

# Use the same setting as you are using on
# the server.
# On most systems, the VPN will not function
# unless you partially or fully disable
# the firewall for the TUN/TAP interface.
;dev tap
dev tun

# Windows needs the TAP-Win32 adapter name
# from the Network Connections panel
# if you have more than one.  On XP SP2,
# you may need to disable the firewall
# for the TAP adapter.
;dev-node MyTap

# Are we connecting to a TCP or
# UDP server?  Use the same setting as
# on the server.
;proto tcp
proto udp

# The hostname/IP and port of the server.
# You can have multiple remote entries
# to load balance between the servers.
;remote 123.123.123.123 443
remote 123.123.123.123 1194

# Choose a random host from the remote
# list for load-balancing.  Otherwise
# try hosts in the order specified.
remote-random

# Keep trying indefinitely to resolve the
# host name of the OpenVPN server.  Very useful
# on machines which are not permanently connected
# to the internet such as laptops.
resolv-retry infinite

# Most clients don't need to bind to
# a specific local port number.
nobind

# Downgrade privileges after initialization (non-Windows only)
;user nobody
;group nobody

# Try to preserve some state across restarts.
persist-key
persist-tun

# If you are connecting through an
# HTTP proxy to reach the actual OpenVPN
# server, put the proxy server/IP and
# port number here.  See the man page
# if your proxy server requires
# authentication.
;http-proxy-retry # retry on connection failures
;http-proxy [proxy server] [proxy port #]

# Wireless networks often produce a lot
# of duplicate packets.  Set this flag
# to silence duplicate packet warnings.
;mute-replay-warnings

# SSL/TLS parms.
# See the server config file for more
# description.  It's best to use
# a separate .crt/.key file pair
# for each client.  A single ca
# file can be used for all clients.
<ca>
-----BEGIN CERTIFICATE-----
MIIDKzCCAhOgAwIBAgIJAOTdLiWELVxRMA0GCSqGSIb3DQEBCwUAMBMxETAPBgNV
BAMMCGd0c2xpbjUwMB4XDTIxMTAxNTA5MTgyMFoXDTMxMTAxMzA5MTgyMFowEzER
MA8GA1UEAwwIZ3RzbGluNTAwggEiMA0GCSqGSIb3DQEBAQUAA4IBDwAwggEKAoIB
AQC3aEsodDCAXY7JUUBG53r99lYiYIYnymCqg17grZB9WgF/TgqCM2+QKSgM9oqe
Xa7r3orucYvIlymyYZpRPWfuU90UirnX1iRMQiU32lN9oSOTeZdFBQzuiax/M8IK
ZpgvDZF9u1UZktrl4L7j4XKuzu3piSV/o7ubBepljEqv6J1iQoUrr8nne78ovpcj
VhNEeotnqC5bJ6gc3zEFT1+BO3FxYP47RyOANdVBNxQGuAX7zJcCGxn7c8wtFqSt
k7s3u5iIEqqSbxZIbq5v/yJvGn15O5+1SJZ4dFFXoYeQCHDb44e1s4dSJoE+Ow4e
RYeKVOhm4pS33h+3CwyuIYL5AgMBAAGjgYEwfzAdBgNVHQ4EFgQU8dAIo9ZyJaqe
m3ckxhH2eZQG4lwwQwYDVR0jBDwwOoAU8dAIo9ZyJaqem3ckxhH2eZQG4lyhF6QV
MBMxETAPBgNVBAMMCGd0c2xpbjUwggkA5N0uJYQtXFEwDAYDVR0TBAUwAwEB/zAL
BgNVHQ8EBAMCAQYwDQYJKoZIhvcNAQELBQADggEBAArRfmJbiYTYCDWzHWa7n1Y2
aVZr4kOAGfRi2+5sq4M8nMPh6layZOmRVk77Ipj0Q1FmJK5xMUsjOthYcYwBCFvK
WIRwntqDYc5ohr6jhezcl3j9R8FoDZAR0NNmlvQnRCsI262Lmk48Posk3OKtq0iQ
mLCLHj1FrWEtpVacHJN48scCKkM73yx6bBjr/h5URCyDrqa1PwQolRi01vp0gaL4
LymVM7Igk38x5MKSxLyaGrtFFhyMh9PPHBCYQ/9BYFU9jvD3odDjJTe8GD2fZFhU
p+qi+HBx4DwUMch7/1f0EdkPEZlPJxOSGlV7CNpLODCDi9RxphCu8wuItf3aa0U=
-----END CERTIFICATE-----
</ca>
<cert>
-----BEGIN CERTIFICATE-----
MIIDSjCCAjKgAwIBAgIQIg9vuEKMmKnjGskj05/FQTANBgkqhkiG9w0BAQsFADAT
MREwDwYDVQQDDAhndHNsaW41MDAeFw0yMTEwMTUwOTI2MDBaFw0zMTEwMTMwOTI2
MDBaMBgxFjAUBgNVBAMMDXZwbi1jbGllbnQtMDEwggEiMA0GCSqGSIb3DQEBAQUA
A4IBDwAwggEKAoIBAQCocCr10jUYpRZtnDQH+tan1ctwmF3ht4uAC/sJvuRBqAYH
M1W2QNMa3jrr7RcDq/jbX8STqjZSWaQ7T78AUbD4bySj5jkV0GxEYMLfwKHUoyu8
i0iuyvi0Kj+XibCtXO6czKPbpZX5ZSqqAEzZWxh9/wqLNJIKwdNYzp7KWiPXLVgg
gmXY2PXcsNqEFMg98/g2tzUpLy/m3pqiWn6wqlpOgy0ItY6y3zs3S+Sshya/e1FQ
l163hocJ2YJrMSOndNzRyEzctvR5iEGVWQk0afHtwi4wU42+IKzeXK8Agxr+a1H8
kIu5zYJ2TfHH15FGs7E17gsl5867jEgjzBcV/2lVAgMBAAGjgZQwgZEwCQYDVR0T
BAIwADAdBgNVHQ4EFgQUN1Eh4p0lXGoH2r7K2Zegh5kJKDIwQwYDVR0jBDwwOoAU
8dAIo9ZyJaqem3ckxhH2eZQG4lyhF6QVMBMxETAPBgNVBAMMCGd0c2xpbjUwggkA
5N0uJYQtXFEwEwYDVR0lBAwwCgYIKwYBBQUHAwIwCwYDVR0PBAQDAgeAMA0GCSqG
SIb3DQEBCwUAA4IBAQB23xTEa9gLyANJSrLFZicVkgjEKBtlpQatPe/eKiyBTjNX
Rr/wEq4ByQG6ZxowrXwcEGxVSw/nzvUYxdvUset63FiRVUD4dzbvyZwDHSStAI89
l8E34mlmqsEIfn1ciZi5FxatpG7AzM+zrlqLzKXMVlX2VjDgcm8mRzkAQffMO90Y
53q9Tz84HVPogu5Njb4M/tE4xxgPQRwYcSviTjfqdXW+2TujjwducCQtSFoPn7Wt
AXdDLxaN/K0J1eWloABdAE+FvRLKR0O/rry1q9BHNDRPbvbgzQ56deWyI3VlP8z4
W7ea6LDbbSUhI9ljX8xv+RARaInXNaa5EbPb5PXM
-----END CERTIFICATE-----
</cert>
<key>
-----BEGIN ENCRYPTED PRIVATE KEY-----
MIIFDjBABgkqhkiG9w0BBQ0wMzAbBgkqhkiG9w0BBQwwDgQIo6So0BoLPGcCAggA
MBQGCCqGSIb3DQMHBAho0vTsUSWKYgSCBMhFOfKCjG0gx/TvDjw2K4Prw7MSWMiR
ZbDv/gswjuRRpo6JF1/rOycE7UJzDWndWp/1aClXyJBxzQcI8h77XIxQU50//vrc
i3y2sICc9/wUCwUZ5gDXTAu76rciO/h+TwgdImHv6ZZ6ZSFQAqRMR/mJvkgTwt8O
tlIHO7l/Np5nQWoyZbZPnpj4icwTaOhj9KJl2a+tVpzKIKSGbnACNIGLZ5x4KfyJ
oIMJDGBMZqYEwCDSwipZol6N7DKiA/9bByjp6ytkAPx94tMakIxi3Fn8fuHJ9q0g
HQLrF+M2oY2N3Hg/d3wOe75lHcGMI2EyUaRCpOxemVdPWRreihW2BTroL41S3cZG
nXc9VzcZDRfOCPsVsDLzb9vKm99s86gq9neQNOZ2j608TUf3KrozQttXmXlYqBpm
GugUgnIJk+Aycj5+FMju1pCxDXaVsO0lM7+zXh8NxyFcwXS21vBOwfxESbDuiFpS
4UwH9STCUxq6iXsJbZyQ8vVCFsAMoGxPMbjQ8hIjxNtjZllwO+vktPjghw+3N49h
dw2EBjMLQNxx0LPSSHqaeoTMWaaHKd1leAJ9uJ5ChfA7FJFrWkmTtoF4Ozgijg3i
3p0QQPyB0qpynpsEAxX/bJm5BrdWE8kCWG3UBD2lrnxL7ePP1bBXaerFxU2uBSRX
3pCc9PdgFH0dfSZyyLC96ol9F6ixM4jS6sXqkyFR9ok8SceD1Mmb9wKYyc5TamTw
4hgfc0wanFnPV8p0o9reb8B0NtXjAojYiod9N5sfOW6c3QWrXSBIZ7yGXNaVhM1/
l0x3AJ0ncT0tdgvumd8Flk80UM4WF7AVptCLtkKJgO67m4iFkDOzK3KZlZYg7CSR
4FM+Ply+jGq3f3nAGJ8cxH7bVE01rYOlKr/De4smZSVWJPMjTymf2/wGDqR0Pzxl
fSUB69HnF0337SZCCRHhsmSnDn1ggYc5FnwemTFsLBIWttBFmDv2dKzcMWanaewn
Szc4ag8cm7vM+fc9Fczs2FPJsPm9GctHx55DxNADBPdDTOWt9+csZ3bxouoOfb/G
j/6dlvo4afntkm6ntj+PRqacIZVZt6bjfoemU1k4eymaHHwgyYsbVOfztxr7hu8v
FuTvehCi4wMyu3VJw4+BGERXDjXnzz3kgvUvE/SwcdY2xPzkN53vodAhtA+oYzaE
JgEjY38sQUph9FoB2jhsRoWnBwT7Kb4jhogw7+epqVKk0NkNjkSJNvmzM8LGbEim
9uTTMNQFeZ9T10o/TylcFV+p/JZgDBgvWHvZ59ApRiiNo7txs8nMDetVSdXXt9F5
HE/1+f6BUUAnoauedP+3g9ByS7YQgF1fxVTdUS5DzAKbhZCrmEJ4q1vNKsohFRXX
RVunZRgXN8hiDtU0Uet6fkqD5OPVNVrwkgwCZRfLU+dYCbUe84cxU/CU8YTUY2r4
INUBqIBEWAm/bpQw9rme/5vXqdHxtFZIz5pD2/PCyofeKLflwicYMZbuZeuhuYg9
W2tSr6OGq6dDGysjTIDIavLHmbyAmhvBzZClU0GqzADRngw44btHbHZeVrloQYd/
TdUpUnm1Zt2lh75WkiDkC+gyDgk8vpf1YczyCq6dYiS9Tu2j3qaaajZkz/vIajZK
D4k=
-----END ENCRYPTED PRIVATE KEY-----
</key>

# Verify server certificate by checking
# that the certicate has the nsCertType
# field set to \"server\".  This is an
# important precaution to protect against
# a potential attack discussed here:
#  http://openvpn.net/howto.html#mitm
#
# To use this feature, you will need to generate
# your server certificates with the nsCertType
# field set to \"server\".  The build-key-server
# script in the easy-rsa folder will do this.
;ns-cert-type server

# If a tls-auth key is used on the server
# then every client must also have the key.
;tls-auth ta.key 1

# Select a cryptographic cipher.
# If the cipher option is used on the server
# then you must also specify it here.
cipher AES-256-CBC

# Enable compression on the VPN link.
# Don't enable this unless it is also
# enabled in the server config file.
;comp-lzo

# Set log file verbosity.
verb 3

# Silence repeating messages
;mute 20

remote-cert-tls server


#MTU
#link-mtu 1544
Este fichero con el contenido pegado se debe importar con el cliente OpenVpn o bien situarlo en la carpeta config del programa, para que aparezca la opción a conectar.
Crear cliente OpenVpn para importar
Con la otra opción es crear un directorio y copiar la configuración del cliente y los certificados generados:
# cd ~
# mkdir vpn-client-01-config
# cp pki/ca.crt vpn-client-01-config/ca.crt
# cp pki/issued/vpn-client-01.crt vpn-client-01-config/client.crt
# cp pki/private/vpn-client-01.key vpn-client-01-config/client.key
# cp pki/ta.key vpn-client-01-config/ta.key
Crear el fichero de cliente vpn-client-01-config/client.ovpn
Copiar el contenido dentro del fichero y cambiar la línea de dirección del servidor donde se encuentra.
# Secure OpenVPN Client Config

#viscosity dns full
#viscosity usepeerdns true
#viscosity dhcp true
tls-client
pull
client
dev tun
proto udp
remote 123.123.123.123 1194
redirect-gateway def1
nobind
persist-key
persist-tun
comp-lzo
verb 3
ca ca.crt
cert client.crt
key client.key
tls-auth ta.key 1
remote-cert-tls server
ns-cert-type server
key-direction 1
cipher AES-256-CBC
tls-version-min 1.2
auth SHA512
tls-cipher TLS-DHE-RSA-WITH-AES-256-GCM-SHA384:TLS-DHE-RSA-WITH-AES-256-CBC-SHA256:TLS-DHE-RSA-WITH-AES-128-GCM-SHA256:TLS-DHE-RSA-WITH-AES-128-CBC-SHA256
Comprimir los ficheros del directorio para descargarlos
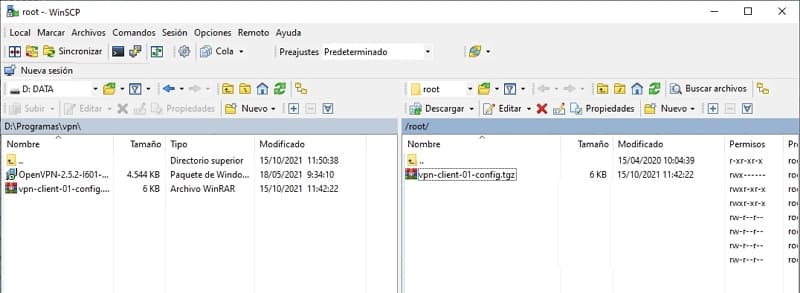
# tar cvfz vpn-client-01-config.tgz vpn-client-01-configSi el acceso es por SSH al servidor, es fácil descargarlo con el cliente SSH WinSCP que permite subir y descargar ficheros entre servidor y cliente de forma segura.
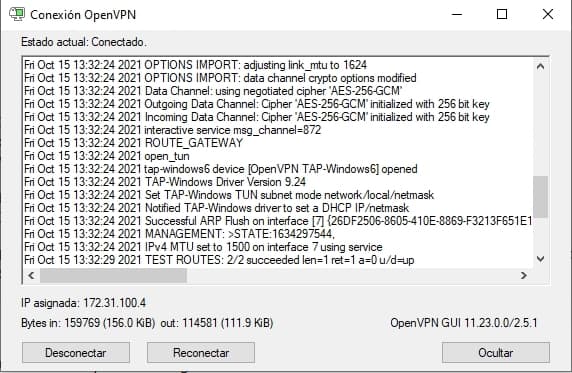
Y finalmente importarlo en el cliente de OpenVpn que debe estar instalado en la máquina que quiere acceder a la VPN.
Espero te sirva de utilidad!!
Deja una respuesta